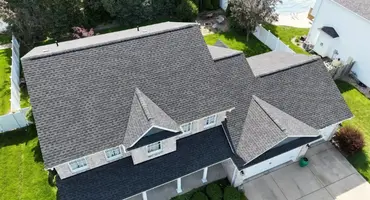
Learning how to install shingles on a gable roof starts with understanding that the triangle shape is actually one of the more straightforward roof styles to shingle correctly. With the right preparation, materials, and sequence, a gable roof installation produces a clean, watertight result that lasts for decades.

A Comprehensive Guide to Shingle Installation on a Gable Roof
Here are the steps for a proper installation:
Step 1: Prepare and Inspect the Roof Deck
The deck is like the foundation of a table. If it’s warped or soft, nothing you put on top will ever feel solid.
- First, remove old roofing, nails, and debris so the deck feels smooth under your hands.
- Walk on the roof, touch it, look for dark spots or softness. Any compromised plywood gets replaced before you go further.
- When it’s dry, stable, and clean, you’re ready to build. This prep makes later steps feel a lot less nerve‑wracking.
Step 2: Gather Tools, Materials, and Safety Equipment
Here are the materials, safety equipment, and tools you might need:
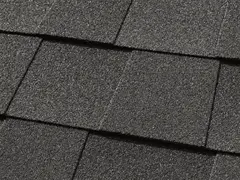
- Asphalt shingle field bundles, starter strips, and ridge cap pieces
- Roofing nails and a nail gun or a hammer
- Underlayment (felt or synthetic) and ice/water shield
- Drip edge, flashing pieces
- Chalk line, ladder, gloves, glasses, and a safety harness
Step 3: Install Drip Edge Flashing
- Place metal drip edge along the eaves first, that’s the bottom edge facing the gutters, so rainwater flows off the roof instead of back under the roof layers.
- Fasten the drip edge with roofing nails spaced about every 8–12 inches so it stays secure in wind and weather.
- After that, install drip edge along the rake (gable) edges to protect the roof decking from wind‑driven rain.
- Overlap pieces a couple of inches so there’s no chance for water to seep through.
Step 4: Lay Roofing Underlayment
This layer is like a protection beneath the shingles.
- Roll it horizontally from the bottom up, overlapping rows by a couple of inches.
- Secure it with cap nails or staples to keep it snug and smooth.
- In cold climates or valleys where water pools, a peel-and-stick ice and water shield is a smart addition.
It sounds simple, but if the material wrinkles or bubbles, it can lead to problems later.
Step 5: Snap Chalk Lines for Straight Courses
- Once the underlayment is smooth and secured, snap horizontal chalk lines across the roof as visible guides for the shingle rows.
- These lines help keep every course straight and evenly spaced, so shingles shed water correctly and look neat.
- You can also snap vertical chalk lines if needed to help stagger seams and align courses for stronger, more consistent coverage.
Step 6: Install Starter Shingles
- Starter shingles go down before the main shingle rows and run along the eaves and rake edges.
- Lay them with the adhesive side facing down and allow the edge to hang just slightly over the drip edge.
- This row gives the first full shingles something secure to grab onto and helps resist wind uplift right at the edge.
- Nail them per product directions with even spacing.
Step 7: Lay the First Course of Full Shingles
This is the most important step:
- Begin at the bottom corner, aligning your first shingle row with the starter strip below.
- Nailing just below the adhesive and keeping the head flush helps each piece lay flat.
- Keep the chalk line handy so each shingle line feels intentional, not guesswork.
Step 8: Continue Installing Shingle Courses Upward
Now, continue the installation.
- Each new row overlaps the one below according to the manufacturer’s instructions. That’s how these shingles shed water.
- Stagger seams so vertical lines don’t stack and make weak spots.
- As you approach edges or valleys, trim with your utility knife to get clean fits that sit flush.
Work slowly and see how the pattern builds. It feels satisfying when the roof starts to look cohesive.
Step 9: Install Flashing Around Roof Penetrations
Any time something pierces the roof like a vent pipe, chimney, or skylight, that’s a potential water trap.
- Wherever your roof has vents, chimneys, pipes, or skylights, metal flashing goes in so water flows around, not in.
- Pieces should overlap and tuck under each other.
- Roofing cement will help seal any exposed nail heads.
Take your time here. This is where a roof often leaks if it’s rushed.
For additional guidance on professional roofing standards, see the National Roofing Contractors Association’s consumer resources.
Step 10: Install Ridge Cap Shingles
When shingle rows reach the peak of the gable, ridge cap shingles go down.
- Once you’ve covered the entire slope, ridge caps span the peak, overlapping each piece so water runs off both sides.
- Nail them so the fasteners are covered or sealed, and keep them straight with a chalk line if you laid one.
- This final row protects the highest point from wind and water intrusion.
Step 11: Final Inspection and Cleanup
Patience pays off here.
- Walk the roof carefully and look for loose nails or misaligned shingles.
- Sweep off debris so water doesn’t pool or log leaves in valleys.
- Make sure gutters and the surrounding ground can whisk water away.
You’ll be amazed at how much a clean site improves how the house feels.
Step 12: Post‑Installation Maintenance Tips
You’ve got your roof on, so don’t just walk away.
- Every season, take a walk with binoculars or just look from the yard for lifting edges.
- Handle small fixes before they become big issues.
- Follow the manufacturer’s maintenance notes so your investment lasts as long as it should.
Conclusion
Installing shingles on a gable roof is really about doing a few simple things in the right sequence. You start with a real inspection of the deck, lay down your layers so rain has no place to sneak in, and build each course with intention. You lay starter pieces, align each row, add flashing around vents, and cap the ridge so water runs off as it should. A final inspection and cleanup help you catch anything you missed. With a bit of seasonal upkeep, your roof will handle rain, wind, and sun for years to come. Contact Sutton’s today if you have shingles installed professionally.
Frequently Asked Questions
1. What is the best material to put under shingles?
For asphalt shingles, a quality roofing felt or synthetic underlayment is your go-to layer beneath the shingles. In areas where ice or wind-driven rain is common, applying peel-and-stick ice and water shield beneath that adds extra protection right where leaks tend to start.
2. How far should shingles hang over the edge of a roof?
Shingles typically overhang the drip edge by about a quarter to three-quarters of an inch. This allows water to drip clear of the fascia and into the gutters.
3. What happens if you don’t put tar paper under shingles?
Skipping underlayment leaves the roof deck exposed to moisture if water ever gets past the shingles; water always finds a way in eventually. Without that layer, you’re looking at leaks, rot, and a much shorter roof life.